30 April 2012

Silver Earthcache Master

A while back I spoke about Mrs Browbury and I gaining the Bronze level for the Earthcache Master series.

Well, after writing the last post about creating our first Geocache, we were then elligible to apply for Silver Level status! This is because we'd found at least 6 Earthcaches in at least three different countries and created at least 1 Earthcache.

Here's a summary of the Earthcaches we've found in reverse chronological order:


GC2NQRY - Belgium - Estimate the volume of a block of Blue Stone and from this work out the weight in dm3

GC2YYE1 - Netherlands - 1. How high ist the highest mainland point from the Netherlands? Information on the stone panel!
2. The three columns are Surrounded by a platform made ​​of cobblestones. How many cobblestones build the outer ring?
3. Which numbers are standing on the octagonal columns?
4. How many meters is the distance from the three-Coutry-point to the highest mainland point of the Netherlands?

GC13ARZ - Kent, England - Found with Twigletcaz - 1. These chalk hills were laid down during the Upper Cretaceous period and were uplifted approx 40 Million years later - what is this period called ?
2. From The Kent part of the North downs is called 'Kent Downs', this carries on west, what is that region of the North Downs called ?
3. In two parts - You have been to two locations - or maybe you haven't, however in order to show that you have physically been to these two locations you will have to
a) You parked in Eccles to take a photo - what is at this location ?
and
b) At the parking area at the top of Blue Bell Hill a notice on the information board tells you how many hectares the area covers - how many hectares?

GC1TWHX - Cornwall, England - In order to log this cache you need to take and upload a photograph of the boulders or cliff and estimate the circumference of the largest ovoid boulder that you can see in the raised beach.

GC14Z0E - Wiltshire, England - 1. What type of sand is the Leigh Delamere rock made up of?
2. How does the quality of this quarry’s stone compare with that of Bath Stone?
3. What do you estimate to be the maximum height of the exposed rockface?


GC2EB0E - Wiltshire, England - 1. According to the sign, how much chalk was imported to fill the white horse, in tons? Why do you think it was imported here rather than taken from the downs?
2. If the chalk erodes at 4 tons per year, approximatey how many tons of chalk are left in the horse this year?
3. According to the sign, what types of plants like to grow specifically in the chalky soil here, making this a SSSI?

For me, this is very exciting as it has meant that we've seen some very special places, not just in the present time, but places special for perhaps millions of years as part of the processes that take place on our wonderful Earth.

If you'd like more information on the EarthCache Master series, click here. Perhaps you're ready to be a master too! :)

Logging our first Earthcache

I'm a real fan of Earthcaches. So how better to start hiding caches than with an Earthcache.

They're a great way to find out about the geology of the earth, especially the geology either local to you or the places that you visit, for instance, on holiday. With an Earthcache, you don't find a container, you find a place. The Earthcache site has a write up on the Geocaching website, explaining the processes that led to the creation of the place. It will also give you a task. Sometimes the task is measuring a block of rock and working out how much it weighs! Ours is a bit easier than that, we just want people to visit a massive chalk quarry and estimate how long it took for a section of the chalk to form.

The location of this Earthcache is also the location of the Westbury White Horse and from the top of the hill there are wonderful panoramic views of the rolling Wiltshire counryside. It's also on of the possible locations for the beginning of England itself when King Alfred defeated the Viking Army in 878AD. So you can see that this is a special place for an Earthcache.

Here's the write up that I've written for the listing:
"This cache takes you to the boundary of a large chalk quarry, called Beggars Knoll. This quarry has been used since 1962 by the cement factory down the hill, where after excavation, the chalk was crushed and mixed with water before being piped down to the factory.


There is plenty of parking, either at the white horse or closer to the quarry itself. The parking waypoint is the closest you can park for this cache. There is a compacted path to walk along, the quarry is to the left.

What has brought us to this spot is the massive scar on the landscape. But while it may be seen as a blot on the landscape, it offers us a unique opportunity to look back for millions of years. At least 65 millions years, to be more exact. This chalk was formed in the Cretaceous period, the last period of the dinosaurs, and the majority of the chalk is part of the Zig Zag Chalk Member.

A this time most of Wiltshire was under a few hundred metres of warm sea. Many sea creatures lived on the sea bed here and local geologists have found fossils of sea urchins and crabs, as well as minute shells of alga.

The depth of the quarry is 80 metres and it's said that there is a further 60 metres of chalk below that. The chalk will have built up over a long period of time, perhaps up to 30 million years. It is said that the chalk reportedly accumulates at a rate of around .5–3 inches (1.25–7.5 cm) per thousand years.

When you reach the cache location it is possible to see, faintly, layers of flint in the chalk. This is thought to be from the remains of organisms that used silica to build their skeletons, such as sponges. In pre-historic times, humans used filnt to make weapons and tools.

From the cache location, look for the track in the quarry, follow this to the far side and estimate the distance from the track to the top of the quarry, if the chalk had accumulated at 7.5cm per thousand years; work out how long it would have taken for this amount of chalk to build up. To claim this cache as a find, please email us with your estimate of how many years it would have taken for the chalk in this section to build up.

While it's not neccessary to claim this cache, it would be nice to see photos of you or your GPS with either the quarry or the chimney stack of the cement factory in the background."

Many thanks to our reviewer geoawareUK2 who helped us iron out some details and proof read my test!

Want to go find it? It's GC3J11Y and called Westbury Zig Zag. I can't show you a photo of the quarry, as that would give the game away. But here's a photo of the view if you turn the other way - wonderful Wiltshire countryside - cement factory chimney stack and all!


Interested in learning more about Earthcaches? See this video about Earthcaching from Geocaching.com:


In the garden - April

It's been a bit of a monotonous month weather-wise across the whole country with all this rain we've been having. But that didn't stop the plants getting on with providnig a good show.

To start we have surprise blooms from the recently planted Falstaff apple tree. As it's so young and only been in the garden for around a month, we've decided that any apples that start growing will be taken off apart from manybe one or two - just to we can get a taste of them! The energy is much better used for sending out branches this year.


Here's one to look forward to next month. It's the Ranunculus that sits in our half barrel and keeps the fish company. Looking forward to it's yellow globe flowers that will bloom for a good long time.


This Toadflax sp. has been the most successful plant we've had in the garden. So successful that I've had to put it in its place from time to time by tearing up handfuls of the stuff so our raised bed doesn't become a monoculture!


This Ajuga was given to us by Lucy's Mum and has been another success for us. It took a while to settle down, but it's coming on strong this year and I hope we'll be able to divide it and help it colonise the back garden.


And now for the grand finale. Last month I showed you the flower buds of our Victoria plum tree and after we came back from visiting family in early April it was in full flow! I took a couple of snaps early April, and I'm glad I did looking back at all this rain. There is now no blossom left on the Victoria at all :( Well that's your lot for April. I'm really looking forward to May and the blessings it will bring. How's your garden coming along? Feel free to leave a link to your monthly garden update - I'd love to have a look.

29 April 2012

Varied Carpet Beetle - Anthrenus verbasci

Date Photographed: 29/04/2012
Location: Tower Road, Melksham
Resources: http://www.uksafari.com/vcbeetle.htm
Notes: Found this littole critter crawling up the spare bedroom wall while on the phone to Mother. When looking for a web resource saw photos of what they can do to carpets, so thanked him for posing for the camera and popped him on the window sill!

28 April 2012

Book Review: Life Stories

The sloth is an animal that I can't imagine Sir David Attenborough as. But that's the answer David (if I can be so familiar to call this great man by his first name) would give. A sloth spends a large amount of its time asleep. Sir David on the other hand has attained a level of output and at a consistent level of quality that would take a lesser mortal like me several lifetimes to achieve.

This book is a collection of stories that David Attenborough told first by the medium of radio. For anyone who has heard a sentence or two of David's unique style, you will know what I mean when I say that he writes as he speaks and this is true of every book of his I've read. This book compliments the radio programme by not only having the transcript of the episodes in the series, but also colour photo plates that further illuminate the topics being described. Now, to be fair, no photos are necessary as Sir David has a power over words and can describe anything in the natural world as if it were in front of you at this very moment in time.

I find it very hard to say anything bad about Attenborough, and luckily I am not required to here. This is a marvellous tome containing David's thoughts, experiences, and opinions on topics such as Monstrous Flowers, Dragons, Birds of Paradise, Faking Fossils, Birds' Nest Soup (inncluding a funny tale of when a bat flew into his face), Adam's Face, and many more. Further more, they are written by a man whos thoughts, experiences, and opinions are worth hearing or reading.

So well received was this book, that a second was published. There's no surprise there. I don't feel that I have a mastery of expression that can do this book justice, other than to strongly suggest that you read it. And, perhaps, there's no surprise there either.


Own or Loan:         Loan
Read Again:           Yes
Recommend:         Yes
Overall out of Five:3
 

Bath Skyline Conversation Task

Back in January Lucy and myself were part of a National Trust conservation task on the Bath Skyline. We have quite an affinity for the Skyline as we walk some part of it mosts weeks when out walking dogs from the Bath Cats and Dogs home.

The Bath Skyline is a 6 mile circular walk that offers wide and wonderful views of Bath and the surrounding countryside. Some of this you can see from the bus tour, but it's much more enjoyable on foot as you have time to appreciate the views and the nature around you. For more information and a PDF version of the annotated OS map, click here to visit the National Trust's page for the walk.

One of the many views

Back to the task at hand. There was a good turn out, so we broke off into two teams. One team starte with the steps. The other, our team, started with the hedge. The hedge was quite overgrown and really needed pulling back so it would throw up some new growth, let the air flow around it, and look generally much better. There was a lot of bramble growing through it and some of the branches of the hawthorn had crossed over into so many other hawthorn bushes that it was a real task to free them from the hedge. But we managed. We created a couple of  'out of the way' piles of prunings that will be free to rot down and give back to the earth. In the meantime they can be used for various creatures as home.

If only that was the lot!
After lunch Lucy and myself moved on to helping with the steps, which were being added to encourage walkers to use a particular route, rather than damaging the whole hill - which is what had unfortunately been happening. This required lots of tools as the going was tough. We used tools such as post hole digging/compacting bars, post rammers (blummin' heavy, aren't they), and pick trowels. It was great fun, especially as it included lots of sliding down the hill at the most inopportune moment. But we got the ground moved, the holes dug and compacted, before checking that the board looked right. We then rammed the posts in before cutting them at a slight angle to let rain slip away (rather than sitting on the post and speeding up the rot). With the board in place we pre-drilled holes and bashed in the nails. Then a quick backfill and treading of the replaced soil before a layer of grit was added to really set the steps off. What was great about this task is that we all got a chance to do everything.

It may not look a lot, but I think it will do the business.
Fancy helping out with the National Trust? It's real good fun AND they provide lots of biscuits and tea! Click here for more info.

26 April 2012

White-Shouldered House Moth (Endrosis sarcitrella)

Date Photographed: 24/04/2012
Location: Tower Road, Melksham
Resources: http://www.pawsforwildlife.co.uk/white-shouldered_house_moth.php

Bloody-nose Beetle - Timarcha tenebricosa

Date Photographed: 26/04/2012
Location: Short River Road, Westbury
Resources: http://www.uksafari.com/bloody-nosedbeetle.htm
Notes: UKs largest leaf beetle. The wing case is fused together, therefore this beetle is wingless. So named because when disturbed it drops a spot of blood from its mouth.

Harlequin Ladybird (19 spot) - Harmonia axyridis succinea

Date Photographed: 26/04/2012
Location: Tower Road, Melksham
Resources: http://www.brickfieldspark.org/data/ladybirdharlequin.htm
Notes: I have registered my sighting of the Harlequin with the Ladybird survey. To ensure that my sighting is correct I have sent them a photo and asked for confirmation. If you see a Harlequin, I would urge you to do the same at: http://www.harlequin-survey.org/recording.htm. There is a simple form, as seen below.
 You will see the screen below when the record has been submitted.

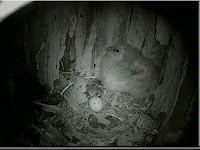
Tawny Owl Chicks - Update

Since I posted the revisited update two weeks ago, a lot has changed. The third chick has perished, while I think it's safe to say that the egg that hadn't hatched two weeks ago, isn't going to.

But on to better news, the two chicks that we last saw and doing well and have put on a lot of weight. At around 5 weeks they should start to leave the nest and begin to fly. They will still be fed by their parents for up to three months after this though, while they learn to hunt and fend for themselves. Interestingly, they will still have the fluffy down when they leave the nest, this will gradually be replaced by adult feathers.

There are some images below and at the bottom there's a video clip that I've bodged together from seperate recordings taken over the course of one evening.

Leaning on each other to keep warm!

Gosh kids you're getting a bit big for this! Mum still manages to wrap her wings around them for warmth.

 
This image was captured tonight. Even though there's food to the right of the second owl, they're just keeping together and not too eager to eat it. Hopefully this is a good sign that they're well fed.


Thanks for reading, Tim

25 April 2012

Planting out a Honeysuckle

As we're currently on a mission to make the garden more private, so we're happter to spend more time in the garden, we've recently put up some trellis. It was a great opportunity to go shopping! Quite often we 'window shop' in the garden centre and I'm told that I can't buy something unless I know where it's going. Jolly good advice, but I rarely know where I'm going to put something - it's just not my style! So this time, having an actual place to put an actual plant, made me quite excited!

After first having a look in the books, knowing that we wanted something hardy and ideally something evergreen, that if we went for a Clematis we'd need a Group 1 (because it doesn't need pruning and will therefore provide cover all year), we both came up with lots of ideas. So, it was then time to do the business, we'd go to the garden centre with intent. After wandering around looking at the Clematis (no group information on the labels), and checking out the Jasmine, we decided that a Honeysuckle was the way to go. Specifically Lonicera henryii 'Copper Beauty', it starts with deep bronze leaves when they're younger, maturing to green. Then in the summer comes the magic, whorls of lovely yellow flowers, with anthers splaying out to pollinators inviting them for a visit, there's even a promise of fragrance!

It's quite a vigorous climber, so the label says, 6-10 metres! That's find as we're likely to buy or make an arch to go next to the trellis at a later date, meaning that it's the ideal plant. Also it doesn't need regular pruning, just prune to remove dead or damaged branches or to keep the plant in check. Every couple of years prune out an older branch to encourage new growth for the bottom. All good so far.

The troublesome, as always in our garden, is the digging. Normally is the clay, this time with was gravel and rubble, as you can see in the photo to the left. The downside of this is that we may need to feed the Honeysuckle more than we were expecting, the upside is that it may keep it in check for us.

Inbetween digging and using the 'claw' to scrape out a hole, I checked one of my books, just to see if there we're any special requirements. I had to ensure that I didn't disturb the rootball, and I had to prune the plant back a bit. The label said that the Honeysuckle wanted lots of compost - there was recently a sale at the garden centre, so I knew I could definitely provide that. I brought the plant up to the whole and found that the hole was plenty deep enough. The middle photo shows the plant without the stakes, I was glad to see that it's a robust plant and can stand on its own. I was less glad with te stuggle of getting the pot-bound thing out of the pot. But managed eventually, although this probably breaks the 'don't disturb the rootball' rule. Hopefully it'll be so glad to be out of a pot that it won't mind?


So after using the bonsai scissors to give the Honeysuckle a light prune we have the big reveal. I'm looking forward to watching the growth of this, I'm hoping that it does exactly what we want. The next job will probably be the hanging baskets - there's no rest for the wicked!


24 April 2012

After the rain comes the Starlings

So, this afternoon we had a sudden random downpour. It lasted for about 15-20 minutes, after which the sun was back out like nothing had happened! Not that I was complaining anyway, as I'd planted a Lonicera Honeysuckle an hour or two earlier - more on that in another post!

I had come down to get a drink and was happy to notice that the Starlings were in the garden trying to pick up a few snacks. And better yet, the camera was where I needed it to be for once - next to me!

I find them such a joy to watch, so deep in concentration for their task - and in the first video one is rather effective and has a beak full lined up at one point! I've uploaded a couple of short video clips. I hope you enjoy them (apologies in advance for the jitteriness):


Camping back in 2010 - Laughton Woods - March 13-15

I enjoyed planning this trip with Mark. As we live 200 miles apart, I created a spreadsheet so we could easily discuss what we'd be taking with regards to equipment and also so we could throw ideas around about food.

We'd decided to go to a spot where Mark and Steve had camped previously, as their old structures could be either reused or used for the fire.
We prefer to used standing dead wood, or as with pine, branches that are hanging off live branches.
Mark always likes to create an area off the ground, which is cool, but I prefer to be as close to nature as possible - and normally to my detriment! The structure that Mark is using here was a repatched version of what he'd used the previous time.
Mark chilling!

On the first night, we had baked potatoes, baked beans, topped with a lovely sprinkling of cheese. It's a nice easy meal after trekking to the spot and getting camp ready.
Baking the potatoes in the embers of the fire. The spuds were so soft, it was wonderful.

The second night we made a beef stew and let it simmer for a good long while. It always seems that food tastes so much better out here in the woods and cooked in this way. For me, it's the only time I really get involved with cooking and really appreciate the food.

Still a while before supper's ready :(
As you can see in the background of this photo, I put some of last years bracken under my bivvy bag. In my bivvy bag is a self-inflating mattress and my sleeping bag. I also had my tarp fairly high. I normally have it to the floor, but wanted to have a go with being able to see around me at all times. It was interesting and probably the approach I'd always take if I had a hammock.

It was great to be out in the woods. As always I enjoyed Mark's company. We did a lot of wandering around the woods which was great and managed to see some cool fungi - some of which had grown on the benches that had been made the last time Mark had camped here.

While the fungi is unidentified, I can tell you that from left to right they are, a jelly fungi, a pull ball fungi, and a bracket fungi.

As always, we took away more rubbish than we arrived with. It's important to appreciate the woodland, not just for accepting you for the weekend, but also for being an important habitat for such a diversity of life. We're not spot on with the no trace way yet - but we're getting there!

If I can find the memory card, I'll upload the photos from the 2011 camp soon!

In the garden - the front garden - Part 2 of 2

This is a continuation of the evolution of our front garden. For the first part, click here.

So the ditch was dug and the hedge was ordered. It was delivered promptly and externally looked like a bunch of dead sticks, but they were biding their time to burst into life! If I remember rightly we planted them around March, potting up the remaining 5 or 6 into pots for replacements if we needed them. By June they were all alive and kicking.

In the meantime we got to thinking about the rest of the front garden. We decided to get rid of the remaining grass, especially the lump in the middle, and lay gravel. We'd also add a couple of raised beds, not only to add interest, but to also to keep the insects happy as we'd taken away their muddy grass habitat.

Here's the bird's eye view. We planted the lavender soon after moving in, this was their second year in the front garden and they were looking fab.
As you can see there is still a bit of a slope in the garden, but it was much better than it was before.
So we put out the raised beds. I had kept some of the grass to use for the bottom of the beds, as the grass rots down it'll provide food for the plants, plus it saved some trips to the tip. We topped up the beds with compost purchased from the local recycling centre for £1 a bag - we filled those bags well!

We ordered the gravel, choosing Solent Gold as this was similar to what is in the other gardens down the street. If I remember correctly we ordered 800kg of the stuff. That was a fun afternoon!


Almost a year on from sorting the front garden, how has it fulfilled its objectives?

I really like the mix of wood chippings and gravel. We chose not to have edging between the two, as I wanted it to have a more nature look.
We're really pleased with the garden. Only one hedge plant needed to be replaced. To ensure that the hedge would bush out at the bottom I took some time to carefully prune all of the plants back. Because there are quite a few different plants in this hedging mix, the hedge was at very different heights by the end of year one. Therefore, while a lot of books say to only prune by a third, some plants were pruned by at least half to ensure that all of the hedge was at the same height. As you can see below, the hedging is bushing out nicely at the bottom. This will create a good barrier and their won't be an unsightly gap at the bottom of the hedge. The double digging seems to have worked well too. The gravel stops too much water seeping into the soil, although quite often the water runs over the hedge border and into the guttering in the road - only time will tell.

Really enjoying the mix of plants in this mix. We're looking forward to next year, when we hope that they'll start flowering. Fingers crossed!
So, other than pruning the hedge, it's very low maintenance. We need to weed the edge of the pavement, but that's it really. All of the plants in the raised beds are doing very well, as you'll see in the April photos of In the garden that I'll put up at the end of the month. And while it may not be providing much privacy yet, it will do in years to come. For the meantime it gives passersby something to look at other than our front window!

Thanks for reading, I hope that you enjoyed the post. If you've written posts on gardening projects like this, I'd love to read them, so feel free to leave a comment!

In the garden - the front garden - Part 1 of 2

The photo above is our front garden as it was when we moved in. It took us a while to decide what we wanted for the front garden, but we knew instantly what we didn't want. Out went those blue planters fairly quickly! I also dug out the tree stumps from someones attempt at tree surgery.

We did know that we wanted some privacy, or at least the feeling of some privacy. We also wanted something that was easy to maintain, but also something that we'd want to look out at and get enjoyment from.

As you can see the garden has a slope towards the path, but what you can't see is that there's a substantial lump in the middle of the grass too! Another thing that you can't see, is that the soil we are blessed with is clay. Oxford clay to be precise, but the name of a posh city, no matter how well known, didn't make digging it any easier! (Click here to find out what's under your garden!).

Regarding the privacy issue, we decided on a low fence to partition us from the neighbours. But looking at the rest of the street, we decided that fencing the whole garden wouldn't be suitable. We really liked the idea of having a hedge around the rest of the garden and set to researching hedging options. We found what's called a 'conservation mix' which includes:
  • 40% Hawthorn (Crataegus monogyna)
  • 15% Blackthorn (Prunus spinosa)
  • 15% Field Maple (Acer campestre)
Plus 5% each from 6 other species inc.
  • Cherry Plum
  • Native Dogwood
  • Crab Apple
  • Guelder Rose
  • Spindle
  • Dog Rose/Field Rose
  • Wayfaring Tree

Having decided on the hedge, I did a bit of research about how to deal with the clay and the regular water logging of the garden! I reached for my trusty RHS Encyclopedia of Gardening Techniques, which led me to deciding that I'd double dig the very front, which was the worst affected with the water logging and single dig the rest. Along with the double digging I'd add a good layer of gravel to help the water disperse, on top of which I'd add a good layer of compost to encourage the plant roots to venture downwards.

The going was tough and it took a while, this is how the front ditch looked after digging.

As this post is getting a bit longer than I expected, I'll continue this on a second post. Please continue reading by clicking here.